Pages

Wednesday, November 17, 2010

Cowboy Cookies


This recipe is from Baked Explorations. by Matt Lewis and Renato Poliafito. There are so many wonderful recipes in this book you should check it out. I bought this book a while back and baked these cookies just after I bought it. I have not had a chance to write about them.
They were easy to put together. I sometimes feel let down when I find out that I have to refrigerate the dough before baking. *sigh. I do, however, love pretzel and chocolate combination. I thought that this recipe was very delicious and the whole family enjoyed it very much. Make these cookies and enjoy:)

Cowboy Cookies

Ingredients:
1 3/4 cups all-purpose flour
1 teaspoon baking soda
1 teaspoon baking powder
1/2 teaspoon salt
2 cups rolled oats
14 tablespoons (1 3/4 sticks) unsalted butter, cool but not cold, cut into 1-inch cubes
3/4 cup granulated sugar
1 cup firmly packed dark brown sugar
1 large egg
1 large egg yolk
1 teaspoon vanilla extract
1 teaspoon instant espresso powder
2 cups semisweet chocolate chunks (about 12 oz)
3/4 cup thin salty pretzels (about 1 1/2 ounces), broken into tiny pieces but not crushed into dust

Makes about 36 cookies

  1. In a medium bowl, whisk together the flour, baking soda, baking powder and salt. Add the oats and stir to combine.
  2. In the bowl of a standing mixer fitted with the paddle attachment, beat the butter and sugars together until smooth and creamy. Add the egg and egg yolk, beating until the mixture looks light and fluffy. Scrape down the sides and bottom of the bowl, add the vanilla, and beat for 5 seconds. Dissolve the espresso powder in 1/4 cup hot water and add it to the bowl, mixing until combined.
  3. Add half of the dry ingredients and mix for 15 seconds. Add the remaining dry ingredients and beat until just incorporated. Scrape down the sides and bottom of the bowl and fold in the chocolate chunks and 1/2 cup of the pretzel pieces.
  4. Cover the bowl tightly and refrigerate the dough for at least 4 hours.
  5. Preheat the oven to 350 degrees F. Line two baking sheets with parchment paper.
  6. Use a small ice cream scoop with a release mechanism to scoop out dough in 2 tablespoon-size balls (or use a tablespoon measure) and place the dough balls onto the prepared baking sheet about 1-inch apart. Sprinkle the remaining 1/4 cup pretzel pieces over the dough balls. Use the palm of your hand to press flatten the ball and push the pretzel pieces into the dough.
  7. Bake for 11 to 13 minutes, rotating the pans halfway through the baking time, until the edges of the cookies are golden brown or just start to darken.
  8. Set the pan on a wire rack for 10 minutes to cool. Use a spatula to transfer the cookies to the rack to cool completely. They can be stored in an airtight container for up to 3 days.

~Michelle

Monday, November 15, 2010

I Attended a Craft Show


I attended a craft show this past weekend at this amazing performing arts and community center that originally opened in 1897. The building is The Lancaster Opera House in Lancaster, NY. It is also the town hall. For more information on the building check out their website.
The show was on the performance floor at the top of the stairs where you would attend a show. The booths were set up where the seats would normally be and there were some fundraising booths on the stage. I didn't take any photographs because I'm not sure how people would respond.
I went mainly to see how people set up their booths and check out their displays. I was also curious about pricing. Everyone had nice displays and good pricing. I bought a pair of earrings and a fabric checkbook holder that I needed desperately.
The floor is not that big and there were around nine jewelry sellers among the bunch. It seemed like jewelry was the majority. I did take notice that the two items that I purchased from two different sellers did not charge tax. I saw one seller of jewelry that had her tax information in view.
I really don't know if craft shows are for me. I really had a wonderful time at the two home parties that I had hosted for me.
I hope that everyone that had a booth there had a successful show.
~Michelle

Sunday, October 17, 2010

Chocolate Chip Cake


Vintage Recipe

The month was October and the year was 1978; I was turning 7 on Halloween. I'm sure the last thing on my mind was baking a cake; eating a cake, maybe. My Aunt used to bake me the most wonderfully decorated cakes for my birthdays and I'm sure that she made a cake for my 7th birthday as well.I have so many recipe books and magazines I don't even know exactly know what I have. Here is a recipe from a book that I received from my mother-in-law when she was cleaning out her collection. The book was published in 1978. It is just one of those small magazine style books. Just look at the price!!
Chocolate Chip Cake is the only recipe I have made from this book. I love cake with sour cream in the ingredients list. I should actually give some other recipes a chance, but you know, when you find a go to recipe you just have to go-to-it. I decided to make this cake the other night for no reason really. The cake is so delicious and absolutely a great cake to serve with coffee for dessert or breakfast for that matter. It is also very simple and would be terrific to take somewhere. The top forms a little crust from the cinnamon and sugar that when mixed with the chocolate is divine.


Pin It


Make this recipe and enjoy with friends or family.


Chocolate Chip Cake (recipe from Simply from Scratch magazine)

2 cups all-purpose flour
1 1/2 cups sugar
2 teaspoons baking powder
1/2 teaspoon baking soda
1/2 teaspoon salt
1 1/3 cups sour cream
2/3 cup butter, softened
1 teaspoon vanilla
3 eggs
1/2 cup sugar
1 teaspoon cinnamon
6-oz. pkg. (1 cup) semi-sweet chocolate pieces (or more if you are like me)


Heat oven to 350F (325 F for glass pan) Grease 13x9-inch pan. (lightly spoon flour into measuring cup; level off.) In large bowl, combine first nine ingredients. Blend 1 minute at low speed; beat 3 minutes at medium speed. Pour half of batter (about 2 1/2 cups) into greased pan. In small bowl, combine 1/2 cup sugar and cinnamon. Sprinkle half of sugar mixture and chocolate pieces over batter. Repeat with remaining batter, sugar mixture and chocolate pieces. Bake 35 to 40 minutes until toothpick inserted in center comes out clean.


~Michelle

Thursday, October 14, 2010

Apple Caramel Cupcakes


I baked some cupcakes for the return of a co-worker to work after a long 5 month absence. I probably should have made him some carrots and hummus or something like that. But everyone knows I like to bake so what else could I do? except bake. right?

The recipe is from A Bakers Field Guide to Cupcakes

Ingredients

Streusel:

1/2 cup (1 stick) unsalted butter, melted
2/3 cup sugar
2 teaspoons ground cinnamon
1/2 teaspoon vanilla extract
Pinch of salt
1 1/4 cups all-purpose flour


Cupcakes:
18 paper liners
2 cups all-purpose flour
1 teaspoon baking powder
1/2 teaspoon baking soda
Pinch of salt
1/2 cup (1 stick) unsalted butter, at room temp.
cut into small pieces
3/4 cup plus 2 tablespoons sugar
2 teaspoons vanilla extract
1/4 teaspoon almond extract
2 large eggs
1 cup sour cream

2/3 cup peeled and diced Granny Smith apples
18 caramels

Directions

  1. To make the streusel, in a large bowl, stir together melted butter, sugar, cinnamon, vanilla extract, and salt until well combined. Stir in flour until smooth. Mixture should clump and form "crumbs" when squeezed between fingertips. Set aside.

  2. To make the cupcakes, preheat oven to 350 F. Place paper liners in all wells of one 12-cup and one 6-cup cupcake tin.

  3. Whisk flour, baking powder, baking soda, and salt together in a small bowl to aerate and combine; set aside.

  4. In a large bowl with an electric mixer on medium-high speed, beat butter until creamy, about 2 minutes. Add sugar gradually, beating until light and fluffy, about 3 minutes, scrapping down the bowl once or twice. Beat in extracts. Beat in eggs one at a time, scraping down after each addition, allowing each egg to be absorbed before continuing. Add the flour mixture in 4 additions, alternating with the sour cream. Begin and end with the flour mixture, stopping when there are still a few streaks of flour.

  5. Fold the chopped apples into the plain cupcake batter. Fill each paper liner about one-quarter of the way full with batter. Top with a bit of streusel, then fill with remaining batter. Top with remaining streusel. Bake for about 22-25 minutes, or until a toothpick inserted in the center shows a few moist crumbs. Cool pans on racks for 5 minutes, then remove cupcakes to cooling racks to cool completely.

  6. Melt caramels in top of double boiler or in microwave. Drizzle over the cooled cupcakes. I added some milk to make a little smoother.

These turned out really good. I should have put a few more apples in them. The texture was kind of a crumb/coffee cake, which I love.


~Michelle

Friday, October 8, 2010

Satin Ribbons, Pearls and Scarves

It's not easy keeping up with blogging. I don't know how people that have full time jobs, families and crafts and house work get everything done. My virtual hat is off to you.

Here are a few items that are coming to my shop. The one at the top of the photo is chain and satin ribbon and some glass pearls all braided together and have a toggle clasp.


The next one has cream and chocolate glass pearls and are hanging from a ribbon that goes around your neck and ties.

The last one is a triple strand of glass pearls in black and cream with a black satin ribbon for the tie around the neck. You can make it several lengths.

I think that I will be making some different versions of these necklaces over the next couple of days and weeks.

I am preparing for another home show at a friends house.


I make jewelry and this is what I chose to wear to work the other day... a knotted scarf:) I used to wear scarves so often a friend of mine, who shall remain nameless with the initials WS, called me Scarf Woman for a time in the '90s.
~Michelle

Sunday, October 3, 2010

Pumpkin, Chocolate Chip and Walnut Loaf Cake

This recipe is from Dying for Chocolate . It's a rainy Saturday fall afternoon and I felt like baking something. It really does not take a rainy day for me to bake something though.

I had purchased some canned pumpkin in case I wanted to bake. I googled 'chocolate and pumpkin' and found this recipe. It is so delicious. It's so moist and chocolately, but I do think that maybe next time I will use fewer nuts. I took the cake to my mom's house on Sunday for dessert and everyone loved the flavor. My mom and I agreed that there were just a few too many nuts.

I did not get a chance to take a picture of the cake, maybe next time. It did quickly disappear.
~Michelle

Sunday, September 12, 2010

Working Hard

I have been working hard on some new things now that the kids are back in school. My oldest son is almost 9 and on the left and my youngest son is 7 and on the right. This was the first day of school.


I have trying to get some things made and priced and photographed and listed. I am also planning on bringing the jewelry to work because the girls that I work with love to buy new jewelry. And in November I am doing a home show at a friends house.
I am going to list a new swarovski necklace in a peridot and sterling silver. I'm working on a white swarovski pearl bracelet with a metal circle as the focal point.


While the kids were at school the other day I was listening to the radio and working hard, in the dining room, creating and photographing and just having a wonderful time.
Here is a photo of the evidence.
~Michelle

Wednesday, August 25, 2010

Wire Wrapped Necklaces

These are one of the first necklaces that I made when I was starting my online shop. I think that these necklaces look amazing. Two of my co-workers, one is an anchor and the other is a reporter, and both of them own one of these necklaces. It looks so amazing on the air. I am so excited when I see one of them wearing a necklace that I made. I think that I will have to post a collage of photos of the jewelry on the air.

You can always go online to My Michelle Jewelry for some other colors.


~Michelle

Wednesday, August 18, 2010

Pink Lemonade Cupcakes

I made these cupcakes and took them to work one day. I thought they were too sweet, at least the frosting. I put them on the table in the newsroom and added a note for disclaimer. "Warning: these Pink Lemonade Cupcakes are very, very sweet" Did that stop anybody? No. They loved them. I liked them and I loved the way that they looked.
So, there you go, you never know exactly what people are going to like. I used the recipe from Cast Sugar's blog.
It is an awesome blog and the photos are simply amazing.

~Michelle


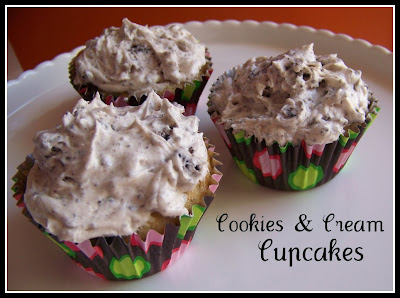
Cookies & Cream Cupcakes

I made these cupcakes a while back and shared some with the neighbors. I thought that they tasted pretty good although the frosting got hard quickly. The cake was very good.

The recipe is from "A Baker's Field Guide to Cupcakes".

Pin It
As I have said, I consider myself a 'recipe' follower and not really an inventor of recipes.

I will continue to bake because it really makes people happy. My family and my neighbors and my co-workers.

Here are a couple of pictures to show just how good they were.

Cookies 'n' Cream Cupcakes
--------------------------------

Cakes:
14 paper liners
1 1/2 cups all-purpose flour
1 1/2 teaspoons baking powder
1/4 teaspoon salt
1/2 cup (1 stick) unsalted butter, at room temperature, cut into small pieces
3/4 cup sugar
1 1/2 teaspoons vanilla extract
2 large eggs
1/2 cup milk, at room temperature
15 chocolate creme sandwich cookies (such as Oreos) chopped
  1. Preheat oven to 350F. Place paper liners in all wells of one 12-cup cupcake tin and one 6-cup tin.
  2. Whisk flour, baking powder, and salt together in a small bowl to aerate and combine; set aside.
  3. In a large bowl with an electric mixer on medium-high speed, beat butter until creamy, about 2 minutes. Add sugar gradually, beating until light and fluffy, about 3 minutes, scraping down the bowl once or twice. Beat in vanilla extract. Beat in eggs one at a time, scraping down after each addition, allowing each egg to be absorbed before continuing. Add the flour mixture in 4 additions, alternately with the milk. Begin and end with the flour mixture, and beat briefly until smooth on low-medium speed after each addition.
  4. Fold 1 cup chopped cookies into cupcake batter. Divide batter evenly among 14 paper liners. Bake for about 18 minutes, or until a toothpick inserted in the center shows a few moist crumbs. Cool pans on racks for 5 minutes, then remove cupcakes to cooling racks to cool completely.
Frosting: Classic confectioners' sugar frosting
1/2 cup (1 stick) unsalted butter, at room temperature, cut into small pieces
4 cups confectioners' sugar, plus an additional 1/2 cup if necessary, whisked before measuring
1/4 cup milk, at room temperature
1 teaspoon vanilla extract
  1. In a large bowl with an electric mixer on medium-high speed, beat butter until creamy, about 2 minutes. Add 1 cup confectioners' sugar gradually, beating until light and fluffy, about 3 minutes, scraping down the bowl once or twice. Add 1 more cup of sugar and about half of the milk and beat until smooth and creamy. Add 1 more cup of sugar and remaining milk, and beat well, scraping down sides of the bowl. Add remaining 1 cup of sugar and vanilla extract and beat on high speed until very light and creamy, about 5 minutes. Assess texture. If it is too soft, add a portion or all of the remaining 1/2 cup of sugar.
  2. Beat the frosting until it is smooth and light. Fold remaining chopped cookies into frosting. Frost cupcakes using a icing spatula or a spoon.
Enjoy
~Michelle


Friday, August 13, 2010

Muffins, Muffins, Muffins

The title "Muffins, Muffins, Muffins" reminds me of the episode from the "Brady Bunch" where Jan says "Marcia, Marcia, Marcia".

Anyway, I made a trio of muffins the other day and took them to work. (The people at my work will eat anything:) The first muffin I made was the same one that I made for my breakfast party , raspberry and dark chocolate. They are so delicious that I had to make them again for a different audience. (These muffins are in the first picture in the collage).

The second muffin I made was a blueberry cinnamon muffin. OHHH what a wonderful muffin, moist and full of blueberries and the topping was wonderful. I'm thinking of trying different fruits inside next time. Thanks evilshenanigans for the recipe. I got rave reviews at work and at home for this one.

The last one was an oatmeal apple muffin. It was moist and tasty. Well, no one at home liked them and there were some left in the container at work so I guess not popular there either. I can't remember where I got the recipe from. But here is a picture of the muffin.


~Michelle

Thursday, July 29, 2010

Breakfast with Friends

One of my very best best friends is in town visiting for the summer from Las Vegas and when we get together visit and eat. The first gathering was at her sister's house and we had a breakfast visit. That is where this picture is from.

I didn't take any pictures of the food that morning but we had some great stuff. Wendy (far right), brought bagels, butter and orange juice, everything that the kids would like. I made a coffee cake, I didn't think that it turned out that great. Jill, the Vegas girl, (next to Wendy) made a delicious biscotti. Amy, the hostess and sister of Vegas girl, (next to Jill) made some wonderful fruit salsa served with pita chips and some cinnamon rolls.
We ate that morning and had a great visit together talking about being Mommy's and about old times, we are High School chums.

We decided to have another visit this time with out Wendy, she had to work. We, of course, met for breakfast this time at my house. I made some dark chocolate and raspberry muffins. They turned out awesome. Great flavor and the dark chocolate/raspberry combo can never fail. We all enjoyed them. I got the idea from Chocolate Chipped blog. Then I clicked to get the recipe from Fresh from the Oven blog.

I also made Sugar donut muffins from Baking Bites blog. They were good not as well received. I think that once they cooled down, I made them that morning, they weren't as tasty. I also did not dip the whole muffin in the sugar because they were kind of falling apart. So, I just dusted the tops. Worked just as well.


Jill and her kids are headed back to Vegas today. I will see her in September when she comes to town to see Amy and Amy's new little bundle of joy. Getting together with the girlfriends, what a great day. It doesn't happen enough.

~Michelle

Saturday, July 17, 2010

Wedding Jewelry ~ follow-up

The wedding is over. All the planning, the stress and even the honeymoon are all behind now. I am still very grateful for the opportunity to make the bridesmaids jewelry. I saw some pictures from the wedding, the weather was perfect and everyone looked just beautiful, especially the bride.

Here are a couple of photographs of the bridesmaids and the jewelry that I made for them. I really think it matches the dresses nicely.

I saw a picture of the flower girl and she is just adorable. Her jewelry is a little bit different. Her necklace has a smaller dangle and the earrings were just coin pearls on small sterling silver studs. Just perfect for her.


Thanks to the bride for including MyMichelle Jewelry on her special day.

xo


Wishing the newly married couple many, many years of wedded bliss.


~Michelle

Thursday, July 8, 2010

Strawberry Pizza


Pin It
I have held on to the piece of paper that has this recipe on it since 1992/93. I was an intern at the television station where I currently work. I worked on the show called AM Buffalo and they would book people to do cooking demonstrations. As an intern I had all of the glamorous jobs. I had to type the recipe on the computer and print it out so people could send in a SASE to receive the recipe then I would stuff the envelopes and send them to the viewers.

A lady came on one day from Becker Farms and she made this Strawberry Pizza recipe. It sounded great so I kept a copy and make it every so often. My husband loves it very much.


I use strawberries from the store because last year we went and picked strawberries (at Becker Farm) and I am not a fan. I prefer to pick cherries.

I made this on the 4Th of July for the family and now my brother and his girlfriend are now fans of this dessert too.


~Michelle


Here is the recipe:

Ingredients:

CRUST:
  • 1-1/2 Cups Flour
  • 1 Cup Butter
  • 1/4 Cup Brown Sugar
  • 1/2 Cup Chopped Pecans or Almonds
FILLING:
  • 1 pkg. (8oz) cream cheese
  • 3/4 Cup powdered sugar
  • 1 container (8oz) whipped topping
TOPPING:
  • 1 Pkg. (3oz) Strawberry Jello
  • 1/2 Cup sugar
  • Dash salt
  • 1 Cup of water of strawberry juice divided
  • 4 TBSP cornstarch
  • 4 Cups sliced strawberries
To make crust: Mix all ingredients to form dough and spread in pizza pan.
Bake at 375 degrees for 15 minutes.
To make filling: Mix cream cheese and icing sugar; fold in whipped topping.
Spread over cooled crust.
To Make topping: Combine jello, sugar, salt and 1/2 cup of water or strawberry juice. Dissolve cornstarch in remaining 1/2 cup of liquid and stir into gelatin mixture. Cook over medium heat until thickened. Stir in strawberries to coat all slices.
Cool slightly and spread on top of filling. Chill and cut into wedges to serve.
~Enjoy

Sunday, June 27, 2010

The String Collection

I created a little something that I call the "String Collection". Here is a photo collage to show the design. I first made 10 of these necklaces and took them to a jewelry party a friend hosted to feature My Michelle Jewelry. The party turned out to be a success and I also think that the string necklaces turned out great and seemed to be very popular. I sold 6 of the 10 that I took to the party.


Yeah!!! I was very proud and excited to show the jewelry off. Check out these necklaces and more at MyMichelleJewelry.etsy.com. These are one-of-a-kind necklaces because I can't always find the same beads and string and I hope to have them all in the shop soon.

~Michelle

Saturday, May 22, 2010

The Communion Cookie and Crazy Story


I decided to bake cross cut out cookies for my son's first holy communion and not the rice krispie treats I wrote about earlier. I was a bit under the weather right before the communion so I wasn't going to bake the cookies, after all we were going to have cake, but the cookies were for the guests to take home. I gave it some thought and baked the cross cut out cookies and then stayed up late frosting and bagging the cookies. They looked so nice. Some were frosted all blue and some, at my son's request, were just outlined in blue and I added white for design.


I put the finished bagged cross cookies in a basket and the morning of the communion my husband took the cookies and cake and everything for the party over to the hall that we had booked. A man was there washing the floors so my hubby just left the stuff there along with a couple of fruit platters that I was up late putting together and plates and decorations and utensils and, well you get the idea.

We came back later to find the place locked and no one ever showed up to let us inside. So there we are everyone in the parking lot waiting for some one that never showed up. We called the food people and had them send the food over to my house stopped and bought some pop and dessert and headed home. My family and friends made it a great day. They helped pick up the house a little and bring over chairs and helped set out plates and cups and everything. What could you do?
The matter has since been resolved and everything turned out to be just wonderful.
We are very proud of our boy. They grow up so very fast.
~Michelle

Tuesday, May 4, 2010

Stuffed Chocolate Chip Cookies

I was in the mood to bake today after visiting my son's new school. Why did that put me in the mood, who knows. (I have been searching the web for recipes and that probably was the reason I wanted to bake.) He is going into the 4th grade in September and will change schools. I remember when I was sending him off to Kindergarten and when the bus came he seemed so sad, so scared. He just looked at me with these big puppy dog brown eyes. Those eyes were saying, "What are you doing to me?". I have to get on this bus with a bunch of kids that I don't even know?

Well, he loves school and the new building is really amazing. It's a 4-5-6 building with 2 gyms, a pool and music lessons. It has just under 1500 kids spread over the 3 grades and is a very big school. The greatest thing is that it is still an elementary school and it definitely feels like a great transition place for middle school. We had a great tour today with the principal and look forward to taking my son there next week to check it out.


OK, back to the baking. I baked Cream Cheese-Stuffed Chocolate Chip Cookies. I used the recipe from BakingBites. She is right they make very large cookies. They baked up to be around 4" wide. As I have said before, not exactly good for the Weight Watchers diet.

The cookies were easy to mix up but not so easy to fill. The dough was hard to wrap around the cream cheese and white chocolate filling. When they baked up the filling thankfully stayed inside the cookie, so that was good. The cookies are soft in the middle and crisp on the edges. The filling really does give it that little something extra.

I brought some in for a few co-workers; I found that the cookies do not travel as well as smaller cookies. I think that the filling makes it a little too soft to hold up in baggies. My work friends just LOVED the cookies... "tastes like Christmas then chocolate and then yummmm cheesecake"... and the cookies also received to thumbs up from someone else.

I love to bring baked goods into work for everyone to enjoy:)

Give these cookies a try you will not be sorry they are delicious.

~Michelle

Wednesday, April 28, 2010

Fit for a Wedding

Here are some pictures of the necklaces and earrings that I made for a co-workers wedding.

I thought that the jewelry was to be given as gifts to the bridesmaids after the wedding, but I was delighted to find out that they are actually for the wedding day. Oh, how exciting.

I think they turned out very nice. The necklaces are made with sterling silver chain and lavender hydrangea chalcedony heart shaped briolettes and czech fire polished rondelles in lavender luster. They also have cream coin pearls in the center of the sterling hoop.

I don't normally like to do custom work because I don't know if I can find what they want and what if they don't like the design. I prefer to make what I like and hope that others like it too. In this case she does like it and I think that they turned out very pretty. Very glittery.


Here are the earrings.


~Michelle

Monday, April 26, 2010

A Cinnamon Bun for My Son


My oldest son likes to eat the cinnamon buns from Tim Horton's. So I began a mission to find some recipes for homemade cinnamon buns. I told him that I would make all different recipes and we would see which one we all liked better.
I began with a recipe from familyfun.com.
This is the actual recipe for "Sweet Cinnamon Rolls". I made it on a Saturday evening and boy did it take it a very long time. The rising was quite a process. It had to rise several times during the evening.

I only had time to take a photo of the finished product because in between the rolling, kneading, rising and baking I was cooking dinner and doing laundry. So there wasn't really time to stop and take the photos.

Late Friday evening we were sitting as a family watching hockey when the cinnamon rolls were finally done baking, and the four of us all shared 1 roll. It was warm and sticky, sweet and delicious. I thought that the cinnamon and brown sugar sort of 'melted' down and it seemed like the filling dripped a little out of the rolls.

We really liked the rolls very much. It was not great for my Weight Watchers diet but really it was not that damaging. My oldest gives the rolls 2 thumbs up and my youngest son said he didn't like the 'dough' part. He is silly.
We enjoyed them and look forward to the next cinnamon roll/bun baking adventure.

~Michelle

Thursday, April 15, 2010

Baking for School

A note came home from school with my son thanking me for volunteering to bring in cookies and to come in for the spring party on Friday. Signing up for things back in September always sounds like a good idea at the time. Next thing you know it's 7 months later and on a 70 degree day your baking cookies.

I decided to bake some cut-outs. I really don't like to make cut-outs because of the rolling and the mess. But, I thought it would be a fun idea to make some Buffalo Sabres cookies since they are playing game 1 in the first round of the playoffs today, and both of my sons Love hockey.


I made the dough and put it the refrigerator to chill. While the cut-out dough was chilling I made a batch of my favorite chocolate chip cookies as back-ups in case the cut-outs don't turn out.

I used this recipe for the sugar cookies and the frosting. Check out the cookies on her blog they are amazing.

I didn't know it was so hard to make dark blue frosting. I guess I need to get blue powder or something or order the colors I need online. Either way I think they turned out pretty nice. I didn't put the buffalo on them because I thought that would be a little hard for my first time using this meringue frosting.


I used the following recipe for the chocolate chip cookies.


Soft and Chewy Chocolate Chip Cookies
recipe courtesy of: Pillsbury: The Complete Book of Baking


Pin It


Ingredients


1 1/4 cups sugar
1 1/4 cups firmly packed brown sugar (I use light)
1 1/2 cups butter (softened)
2 teaspoons vanilla
3 eggs
4 1/4 cups all purpose flour
2 teaspoons baking soda
1/2 teaspoons salt
1 to 2 (12-oz) pkg. semi-sweet chocolate chips

Heat oven to 375F. In large bowl, beat sugar, brown sugar and butter until light and fluffy. Add vanilla and eggs; blend well. Add flour, baking soda and salt; mix well. Stir in chocolate chips. Drop dough by rounded tablespoonsfuls 2 inches apart onto ungreased cookie sheets
Bake at 375F. for 8 to 10 minutes or until light golden brown.
**Everyone that tries these chocolate chip cookies absolutely loves them. I have made these cookies so many times that my cookbook pages are falling out from opening to the same section so many times.

~Michelle

Wednesday, April 14, 2010

Special Birthday Earrings

I went to the local bead store to pick up some wire to make some rings (that's another frustrating story), and I saw these hammered hoops and had to make some earrings out of them. I may even go back and pick up some more and make a pair for myself.

They have sterling silver ear wires and just the prettiest little czech glass bead. It kind of has a purple tint to the bead.
If you like the earrings and are interested in buying them, you are in luck because they are for sale. Go to my shop to purchase. Special birthday earrings. Keep reading to find out about their name.

While I was at the store I met a lady. She announces that she was having an 'ugly' day and I told her that I thought she looked great. She had dyed dark black hair and a very chic black outfit. Her nails were very long, beautifully painted and clearly fake. She had a great attitude and reminded me of a little Italian grandmother, like the one I used to have, except my Grandmother's hair was dyed red and did not have fake nails because of all the cooking she did.

The lady was there to have a larger clasp and ring put on a necklace, probably because her nails were just too long to work the closure.

After I told her that she looked great she asked me to guess how old she was and that she would not be mad no matter what I guessed. So I guessed 65. She said, even with all of these wrinkles? I really did not see many wrinkles, she did have a lot of make-up on though.

It turns out that she is 79 and turning 80 in May. I really did not think that she was that old. I thought she was so cute and as I left I told her to have a great birthday.

If I am lucky enough to live to 79 I hope to be that put-together and independent.

Happy Birthday
~Michelle

Friday, April 9, 2010

Communion Treat

I decided to practice making some treats for my son's first communion. I want to make something to give as take home thank you treats. So, I'm practicing these rice krispie treats covered in chocolate.


I used a jelly roll pan so that the treats would be a little thinner. I think that worked out alright. I cut them into squares and dipped them in melted semi-sweet chocolate. The chocolate seemed a bit thick so I might have to thin it out a bit for easier dipping. Dipping a marshmallow treat in warm chocolate must be done quickly so the treat doesn't start to get sticky.


I put them in the fridge for a little bit to help set the chocolate and this is how they turned out. Like I said I would probably just thin the chocolate a little bit to help with the dipping.


But, really no matter how the look they taste *awesome*.

I will put them in little bags with ribbon and little tags. I think that will work just fine. I might have to make some dipped in white chocolate because my son that is making his communion really likes white chocolate.

Wednesday, April 7, 2010

Something for Your Everyday

When I started to sell my jewelry on Etsy I ordered some business cards and added the line, "Handcrafted Jewelry for Your Everyday". I really believe that the jewelry I make is for wearing everyday because you should feel special everyday.

Here are a couple of examples of the casual yet pretty earrings that you can find at my little shop. I really have been enjoying creating and offering my work for sale. It is hard to find the time sometimes to create, photograph, edit and post the jewelry and I'm not always organized. I'm organized in my mind but I don't know if that counts.

My husband finally convinced me to move the jewelry making upstairs and off of the kitchen table so now I have a little desk to do my work. No TV though and I do like to watch my stories while I work.

I will have to take some photographs to show off the space. I know I like to see into the world of other jewelry makers and bakers. I will also take a few pics of some beautiful earrings and necklaces I am working on for a co-worker. They are turning out very, very nice and I hope the girls in her wedding like the jewelry.
~Michelle

print friendly